How to Decorate a Cozy Rustic Christmas Tree
Looking for the perfect neutral Christmas decor aesthetic? This step-by-step guide covers everything you need to know about choosing and styling a gorgeous artificial Christmas tree with a warm rustic and cozy vibe! Learn the secrets to fluffing your flocked Christmas tree, layering ribbon and picks, and using a warm color palette for a designer look. Stop scrolling and start decorating!
10/3/20254 min read
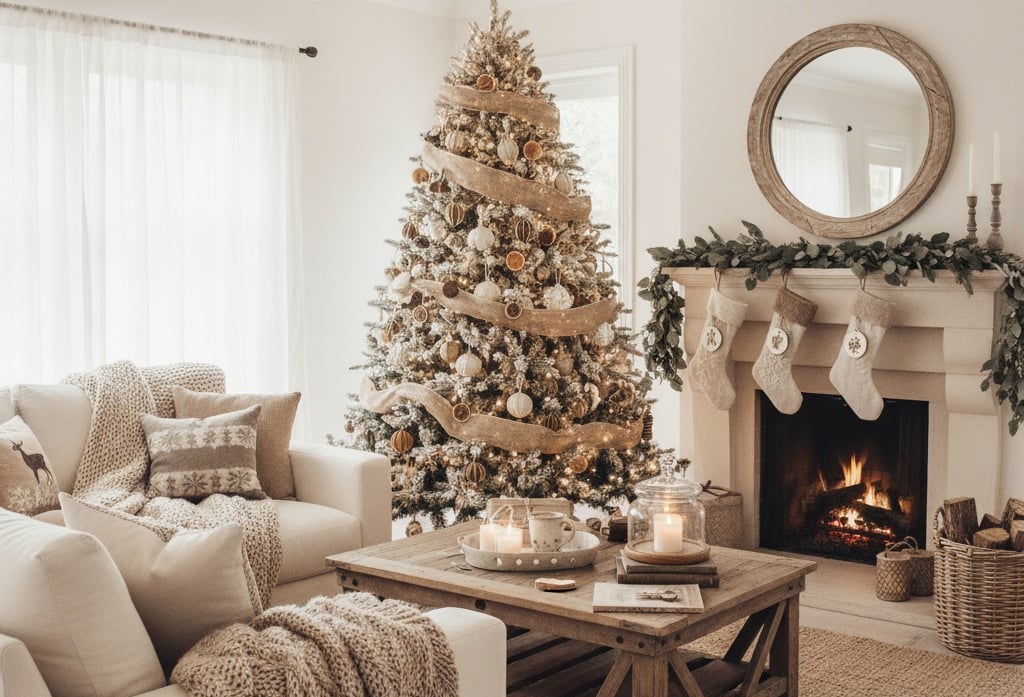
Oh, hey there, cozy Christmas lovers! 👋 Can you believe it's already that time of year again? The air is getting crisp, the sweaters are coming out, and my favorite scent of cinnamon and pine is starting to fill the house. And you know what that means, right? It's time to talk Christmas trees!
This year, I'm all about creating that ultimate, warm, rustic, and oh-so-cozy vibe that just makes you want to curl up with a hot cocoa and watch holiday movies all day long. And a huge part of achieving that dreamy aesthetic is nailing your Christmas tree game. So grab your favorite festive drink, because we're diving deep into selecting, decorating, and styling the perfect artificial Christmas tree for a truly magical season!
The Art of the Artificial: Why I'm a Convert (and You Should Be Too!)
Now, I know some of you might be team real tree, and I totally get the nostalgia and that fresh pine scent! But for me, the convenience, durability, and sheer variety of artificial trees have completely won me over. Think about it: no messy needles, no constant watering, and you can reuse it year after year, which is great for the planet and your wallet! Plus, the quality of artificial trees these days? Chef's kiss! They look so incredibly realistic, you'd never know the difference.
Step 1: Selecting Your Dream Tree 🌲
This is where the magic begins! Choosing the right artificial tree sets the foundation for your entire cozy Christmas theme.
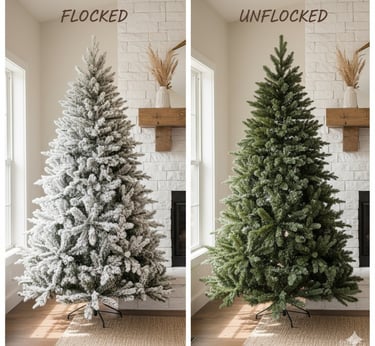
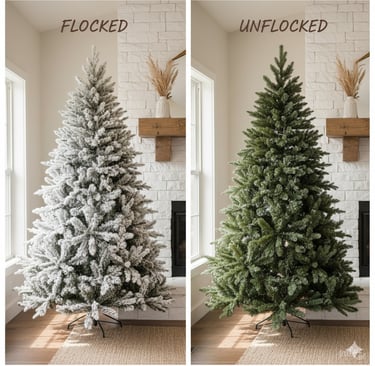
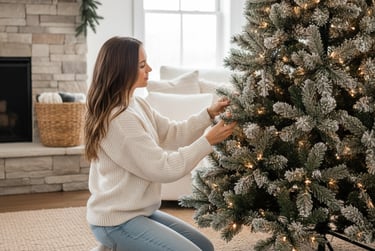
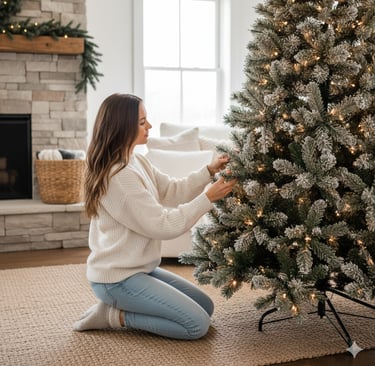
Flocked vs. Unflocked: For that rustic, winter wonderland feel, I am obsessed with flocked trees. The lightly dusted "snow" instantly adds a layer of warmth and texture. If you prefer a more traditional look, an unflocked tree is classic and beautiful.
Height & Width: Measure your space! You want a tree that feels grand but doesn't overwhelm the room. For my living room, I went with a gorgeous 9-foot slim-profile tree because it gives that impressive height without taking up too much floor space.
Lighting: Pre-lit or unlit? Honestly, pre-lit is a game-changer. It saves so much time and frustration! Look for warm white LED lights for that inviting glow. Some trees even have multiple light functions, which is super fun.
Step 2: Fluffing for Fullness (Don't Skip This!)
This is probably the most crucial step for making an artificial tree look absolutely stunning and realistic. When your tree comes out of the box, it's usually compressed. You must take the time to fluff every single branch and tip.
Start from the bottom and work your way up.
Pull individual branches outward and slightly upward.
Bend the smaller tips in different directions to fill in gaps and create a natural, organic shape.
This process might take an hour or two, but trust me, it's worth every minute! A well-fluffed tree looks twice as expensive and inviting.
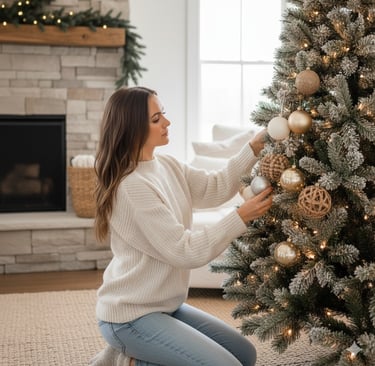
Step 3: Layering Like a Pro: Decorating & Styling Your Cozy Tree
Now for the fun part – bringing your tree to life with gorgeous decor! My secret to that rich, layered, influencer-worthy look is to think in layers.
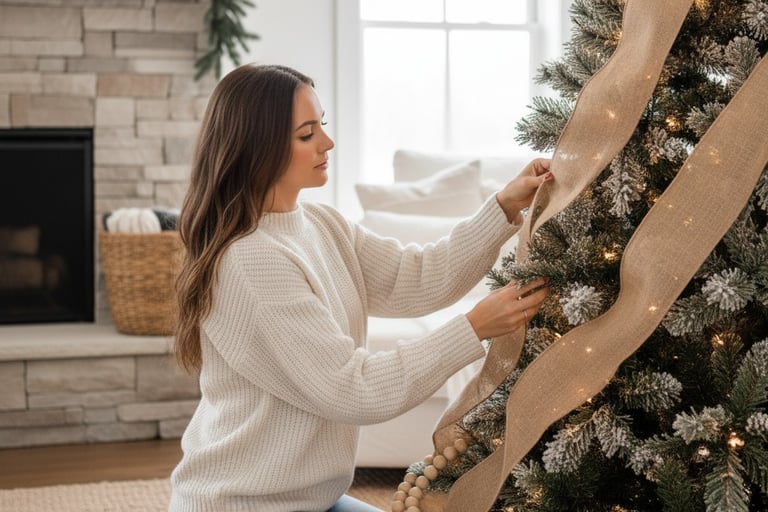
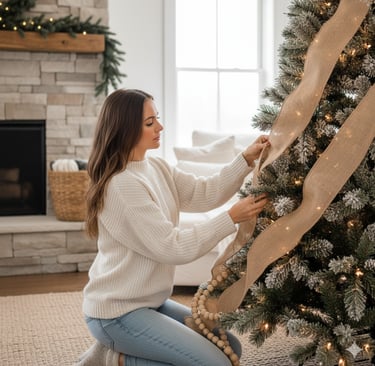
Layer 1: Ribbons & Garlands (The Foundation)
Forget just hanging ornaments! Start with texture and flow.
Ribbon: I love using wide, wired burlap or a rustic linen ribbon. Cut it into long strips and tuck it deep into the tree, letting it cascade down and around the branches. You can do a simple vertical drape or a more intricate "tucked and puffed" method. This adds so much warmth and visual interest.
Bead Garlands: Wooden bead garlands or even a simple strand of jute rope can add another rustic layer. Drape them loosely around the tree, letting them fall naturally.
Layer 2: Filler Ornaments (The Base)
Next, it's time for your "filler" ornaments. These are typically your bulkier, less expensive ornaments that help fill out the tree and add depth.
Color Palette: For my cozy rustic theme, I stick to a neutral and warm palette: champagne gold, matte white, creamy ivory, and natural wood tones.
Size & Texture: Use a variety of sizes – large, medium, and small. Mix textures too! Think glitter, matte, shiny, woven rattan, and even some faux berries or pinecones.
Placement: Tuck these ornaments deep into the tree, closer to the trunk, to give the illusion of a really full tree. Don't just hang them on the tips of the branches!
Layer 3: Feature Ornaments & Picks (The Sparkle & Personality)
These are your special, eye-catching ornaments and tree picks that really make your tree shine and reflect your personal style.
Unique Ornaments: These could be sentimental ornaments, intricately designed pieces, or anything that adds that "wow" factor. Place these strategically on the outer edges of the branches where they can be admired.
Tree Picks/Sprays: This is my secret weapon for a truly professional-looking tree! Think long, wired branches of faux eucalyptus, frosted berries, glittery twigs, or even dried orange slices for that rustic touch. Stick these into any remaining gaps or to add height and drama, especially towards the top.

Connect
contact@cozyhavenlife.com
© 2025. All rights reserved.
This post may contain affiliate links, which means I might earn a small commission (at no extra cost to you) if you decide to make a purchase through one of these links. I only recommend products I actually use or genuinely believe will bring value.
Thanks for the support!
This site contains AI generated Images