EASY DIY Macrame Christmas Tree Garland for Beginners
Looking for a unique, boho Christmas decor project? Learn how to make a macrame garland featuring mini Christmas trees! This is the perfect macrame project for beginners—it uses only the basic Square Knot to create adorable, textured holiday decor for your mantel, Christmas tree, or wall. Our easy step-by-step tutorial includes the exact materials list and cord measurements you need for a fun, festive holiday craft.
10/19/20255 min read
Boho Holiday Charm:
DIY Macrame Christmas Tree Garland
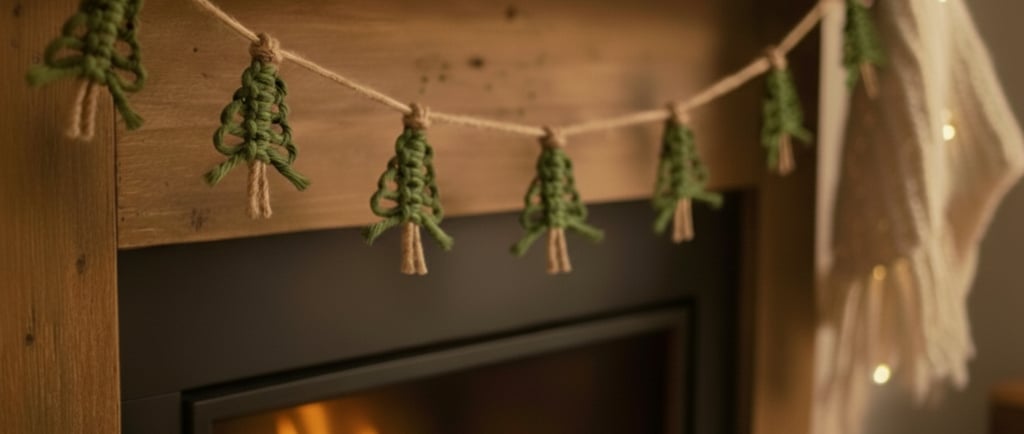
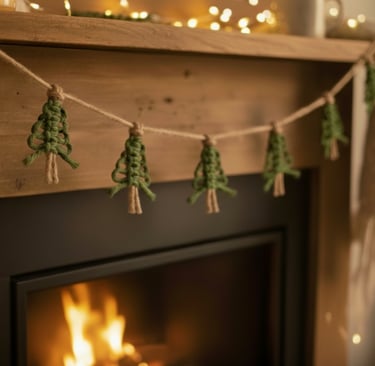
Give your holiday decor a cozy, handmade touch this year with a beautiful macrame Christmas tree garland! This project is perfect for macrame beginners, as it primarily uses one simple knot to create these adorable little trees.
The final garland is a lovely blend of rustic and bohemian style, perfect for draping over a mantel, on a Christmas tree, or along a shelf. Let's get knotting!
Materials Needed
Click on the each description for product links.
For the Garland Cord: Natural colored macrame cord (or thick jute twine) - 3mm or 4mm thickness works well. You'll need about 10-15 feet for a standard-sized garland.
For the Trees (Green Cord): Green macrame cord (or a similar thickness yarn/cord) - 3mm or 4mm thickness.
Note: For each tree, you will need two pieces of green cord, approximately 4 feet (120 cm) long each. (Adjust length based on your desired tree size and cord thickness—it's better to have too much!)
For the Tree "Trunk" (Brown Cord): Brown/natural macrame cord (3mm or 4mm).
For each tree, you will need two pieces of brown cord, approximately 10 inches (25 cm) long each.
Tools:
T-pins or clips (to secure your work surface)
A macrame board, clipboard, or a piece of cork/cardboard to pin your work onto.
Fabric glue or hot glue (for securing ends)
Step-by-Step Instructions
This project primarily uses the Square Knot.
Preparing the Cords
1. Cut the Cord for the Garland:
Determine the desired length of your garland and cut the natural-colored cord to that length, plus a little extra for knots and hanging loops. This is your main Garland Cord. Secure one end to your workspace with a clip or pin.
2. Cut the Cords for One Tree:
Cut two pieces of green cord, each about 4 feet (120 cm) long. These will be your working cords for the tree.
Cut two pieces of brown cord, each about 10 inches (25 cm) long. These will be your core cords for the tree.
3. Attach the Tree's Core to the Garland Cord:
Locate the spot on your Garland Cord where you want your first tree to hang.
Take your two short brown cords (the "trunk") and lay them parallel to each other.
Use a Lark's Head knot to attach these two brown cords to the Garland Cord.
To make a Lark's Head Knot: Fold the brown cords in half. Place the loop under the Garland Cord. Pull the four ends over the Garland Cord and through the loop. Pull tight.
https://www.knotmodernmacrame.com
Tying the Macrame Tree
https://www.youtube.com/watch?v=q7pqyPwhyyo
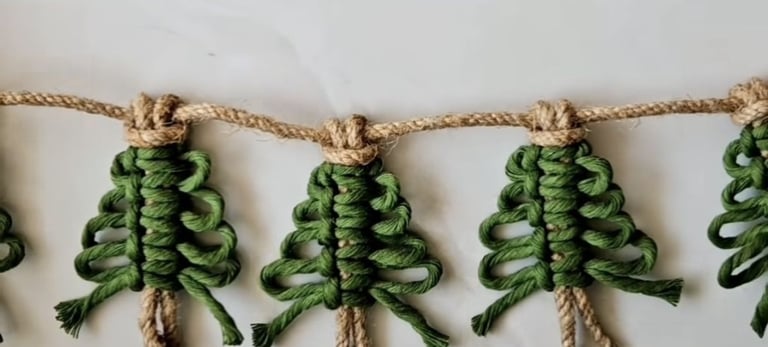
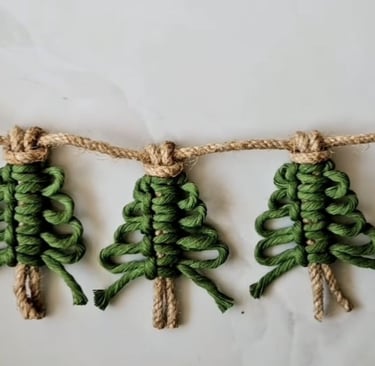
Now you will use your long green cords and the square knot technique to create the tree shape. The two brown cords from Step 3 will be your Core Cords, and the two long green cords will be your Working Cords.
4. Attach the Green Working Cords:
Take your two long green cords. You will use these to tie a series of Square Knots around the two brown Core Cords.
Fold the green cords in half, creating a loop. Slide the loop under the two brown Core Cords, aligning the fold at the top of where you want the tree to begin (just under the Lark's Head knot you tied in Step 3).
5. Tie the First Square Knot (The Tree Peak):
Use the four strands of the green cord. The two outer cords are your Working Cords, and the two center brown cords are your Core Cords.
Half Knot 1 (Left to Right): Take the left Working Cord, cross it over the Core Cords. Take the right Working Cord, pass it under the left Working Cord, then up through the loop on the left. Pull tight.
Half Knot 2 (Right to Left): Take the right Working Cord, cross it over the Core Cords. Take the left Working Cord, pass it under the right Working Cord, then up through the loop on the right. Pull tight to complete the Square Knot.
The knot should be snug against the Garland Cord attachment, but not so tight that the core cords buckle.
6. Continue Tying Square Knots to Form the Tree:
Continue tying Square Knots below the first one. For each subsequent knot, leave a small, gradually increasing space between the knots. This creates the triangle shape of the tree.
For example, the space between knot 1 and 2 is small, the space between knot 2 and 3 is slightly larger, and so on.
Keep tying knots and increasing the spacing until you have a length that you are happy with for your tree. The overall shape should be a widening triangular chain of knots.
7. Taper the Base of the Tree:
Once you have reached the desired size, tie one last Square Knot directly below the previous one, leaving no space this time. This will cinch the cord and represent the bottom of the green tree.
8. Finish the Trunk:
The two original short brown cords (your Core Cords) will now hang down, forming the tree trunk.
Using the remaining green cord tails, tie an Overhand Knot or another tight Square Knot around the two brown core cords just below the last green knot, making a tidy finish.
Trim the remaining green cord ends close to the knot.
Assembling the Garland
9. Trim and Secure the Cords:
Take your scissors and trim the ends of the two brown trunk cords to an even, clean length to form the tree trunk.
Optional but recommended: Place a small dab of fabric glue or hot glue on the back of the final knot on the tree and on the cut ends of the green cords to prevent unraveling and keep the tree shape secure.
10. Add the Next Tree:
Measure the desired distance from your first tree along the Garland Cord (about 4-6 inches is a good start, but adjust for your preference).
Use a Gathering Knot to secure the Garland Cord between the trees. This not only keeps the spacing consistent but also creates the lovely little knotted accent above each tree.
To make a Gathering Knot: Loop a short separate piece of natural cord around the main Garland Cord. Wrap the short cord around the Garland Cord 3-4 times. Push the end of the short cord through the bottom of the loop and pull the other end to tighten the wraps. Trim and secure the ends of the short cord with glue.
Repeat Part 1, Step 2 to Part 2, Step 8 to attach and knot the next macrame tree.
11. Complete the Garland:
Continue attaching macrame trees and separating them with your chosen knot (Lark's Head or Gathering Knot) until your garland reaches the desired length.
Tie an overhand knot on both ends of the Garland Cord to create loops for hanging.
Hang your finished macrame Christmas tree garland and enjoy the cozy, festive atmosphere it brings!
Connect
contact@cozyhavenlife.com
© 2025. All rights reserved.
This post may contain affiliate links, which means I might earn a small commission (at no extra cost to you) if you decide to make a purchase through one of these links. I only recommend products I actually use or genuinely believe will bring value.
Thanks for the support!
This site contains AI generated Images